
Have you yet figured out how to construct a contact form in WordPress website? If not already, follow the guide below to get several helpful tips straight now. But first, we give a brief description of a contact form and its advantages.
What is the meaning of a contact form?
A page on your WordPress website is a contact form. Filling out a variety of areas, including name, address, comment, and much more, will enable your users to connect with you and communicate with you. Most business websites also include an email address you can use to contact them if you need anything additional or assistance. While using the contact form will give users an immediate option to ask the company inquiries, it is thought to be inconvenient manner for businesses.
The benefits when you create a contact form in WordPress on your site
To create a contact form in WordPress for your site is essential if you run a business. It is viewed as the link that enables your clients to get in touch with you quickly if they have a purchase, a question, or another cause. Additionally, there are a number of beneficial advantages to using a contact form as opposed to providing your phone number and email address, including:
- Protect your email inbox from spam: There is no guarantee that this method will completely shield your website from spam. Utilizing various spam protection measures or incorporating a ReCaptcha function, will reduce the number of spammers who attempt to target your mailbox.
- Keep track of your messages: You will receive email notifications or reminders once the contact forms are submitted. As a result, you won’t miss any messages and can respond to them immediately, which increases client satisfaction.
- Obtain all the information you require in one location: Normally, when customers email questions, they frequently neglect to include some important details. You can include boxes with different fields on contact forms for customers to fill up. You can now receive all information as a result.
Steps to create a contact form in WordPress on your site
In order to create a contact form in WordPress without writing a single line of code, several effective tools have been developed by web developers up until this point. It is challenging for you as a newbie when you don’t know which tool, to begin with. The two simplest plugins, Ninja Forms, and Formidable Forms are used to assist you to develop a contact form in today’s blog.
Let’s now dive into each solution’s step-by-step instructions below.
Solutions
Method 1: using Ninja forms
With over 20,000,000 downloads globally, one of Saturday Drive’s most well-known form builder plugins is Ninja Forms. You may get a lot of useful functionality from this plugin in addition to its user-friendly design and many innovative features. You can choose between two versions, the free version, and the Pro version. We will now assist you in creating a contact form using the free version. Let’s begin.
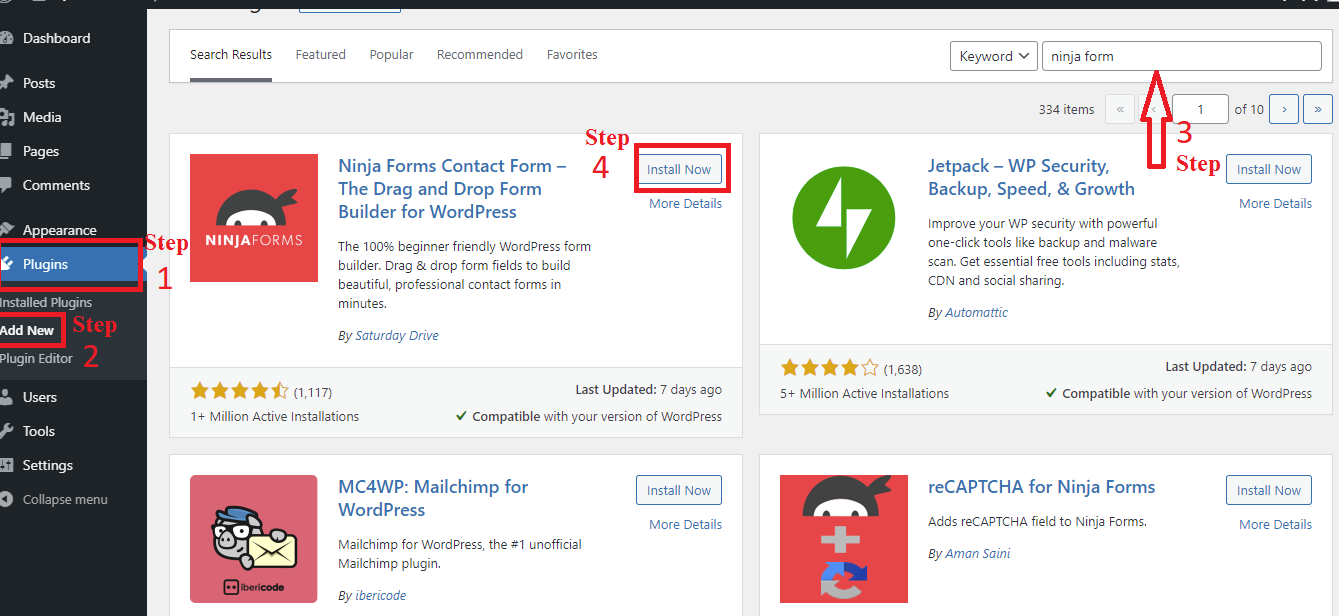
Step 1: Installing and activating Ninja forms
You can install and activate this plugin in less than a minute, just like with other plugins. Just navigate to your Dashboard and choose Plugins>Add New. Enter “Ninja form” into the search box. Install and activate it right away.
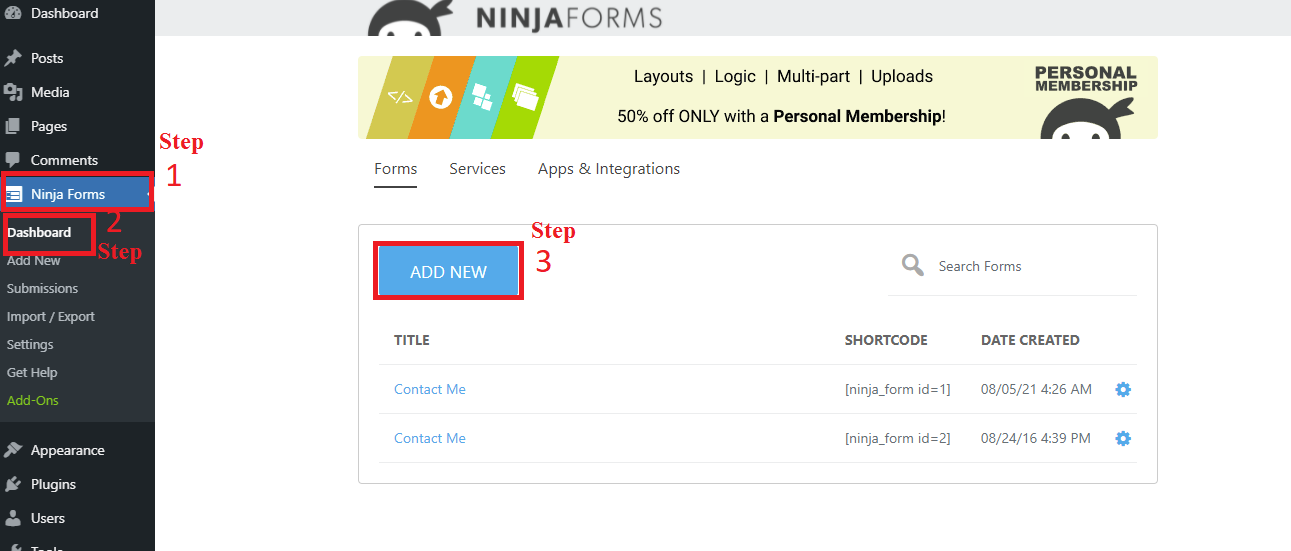
 Step 2: Building contact form
To begin, navigate to Ninja Forms > Dashboard > Add New and select the form types you wish to build.
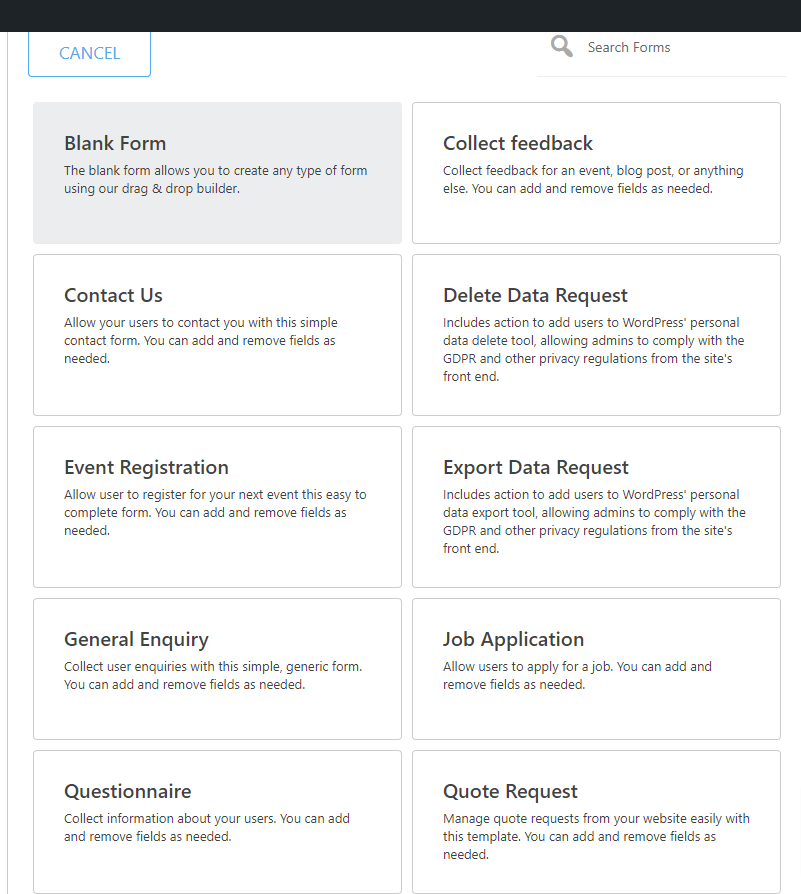
Here, a variety of forms kinds are listed; you can start with a blank form or select one of the pre-made forms and customize it to your needs.
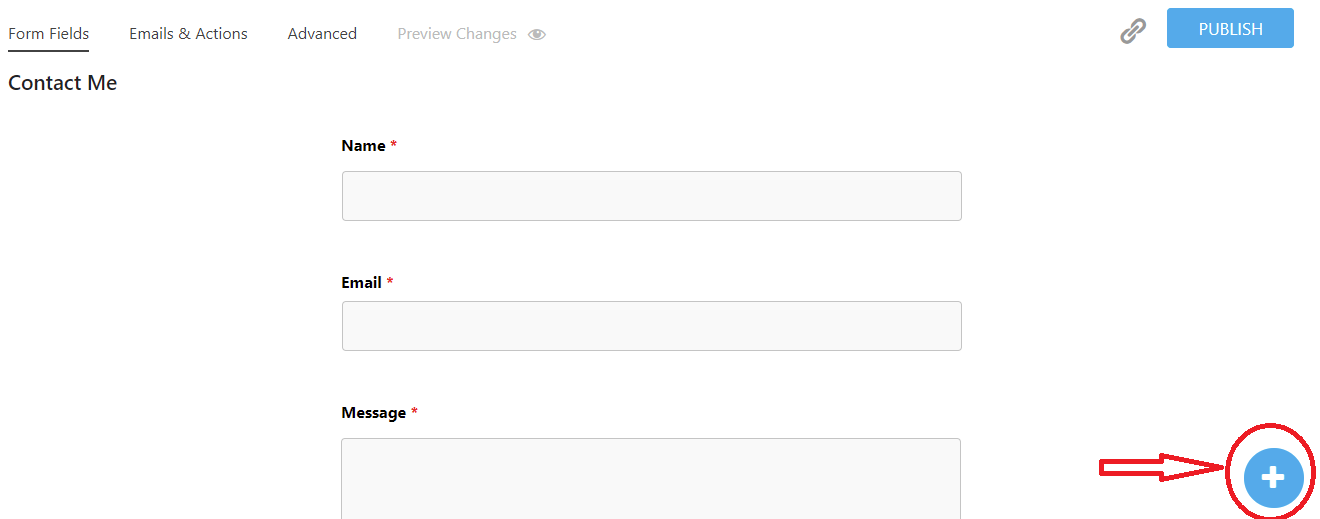
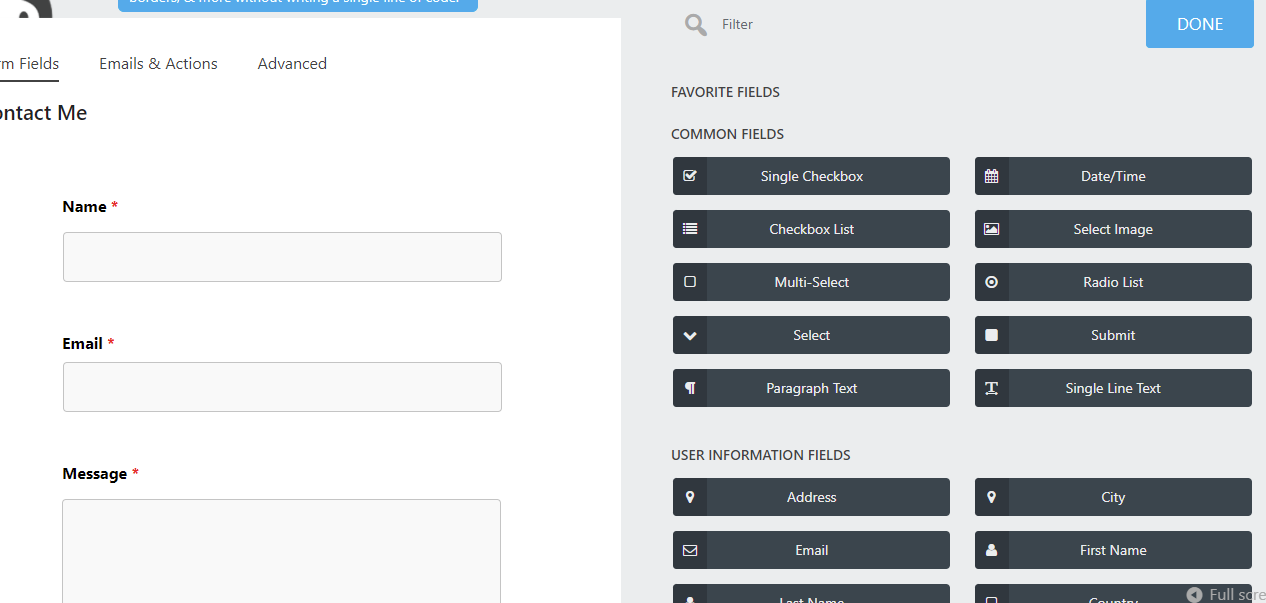
After selecting your preferred form. If this form satisfies your needs, you can click Publish now to obtain the shortcode. On the other hand, you can change it by clicking the “+” sign.
The screenshot below displays an assortment of common fields. You may easily drag and drop it to a different location on the contact form based on your preferences.
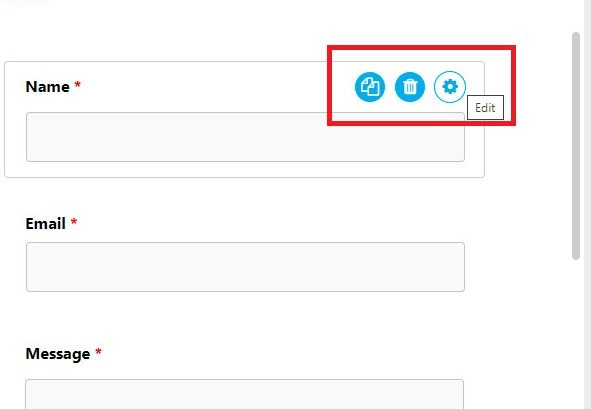
You can delete a field by clicking on the trash can icon after hovering over the gear to reveal it.
You can also turn off store submissions, email notifications, and email confirmation under the Emails and Actions page. In contrast, if you get all emails and consent to actions, you can close this tab. You can modify the form title by selecting the display settings option under the Advanced tab.

Step 3: Adding your form to a page
- Option 1: using shortcode
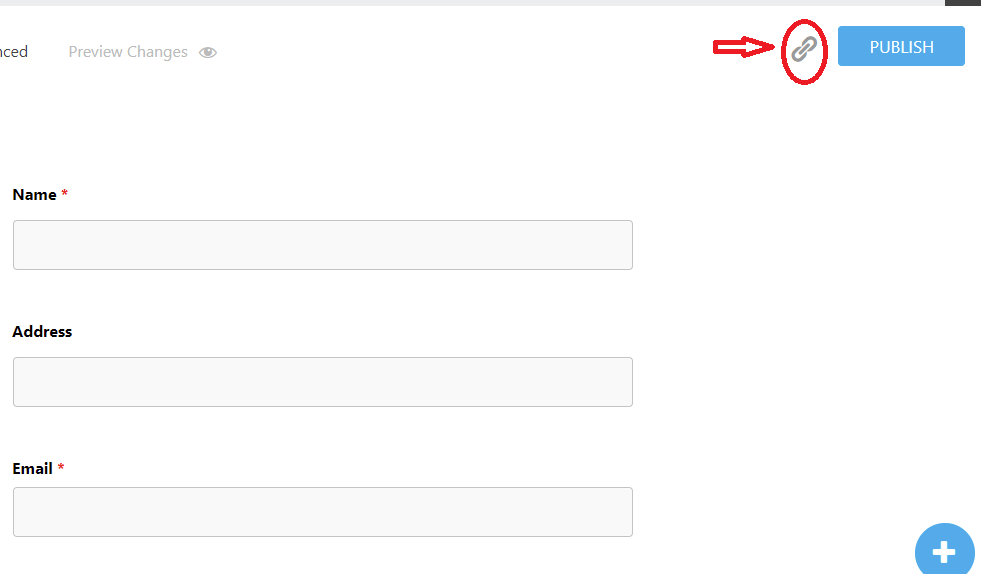
Click “Done” after creating a visually appealing contact form, then “Publish” it as soon as possible. By clicking on the link icon, you may then instantly obtain a shortcode and copy it to add to your page.
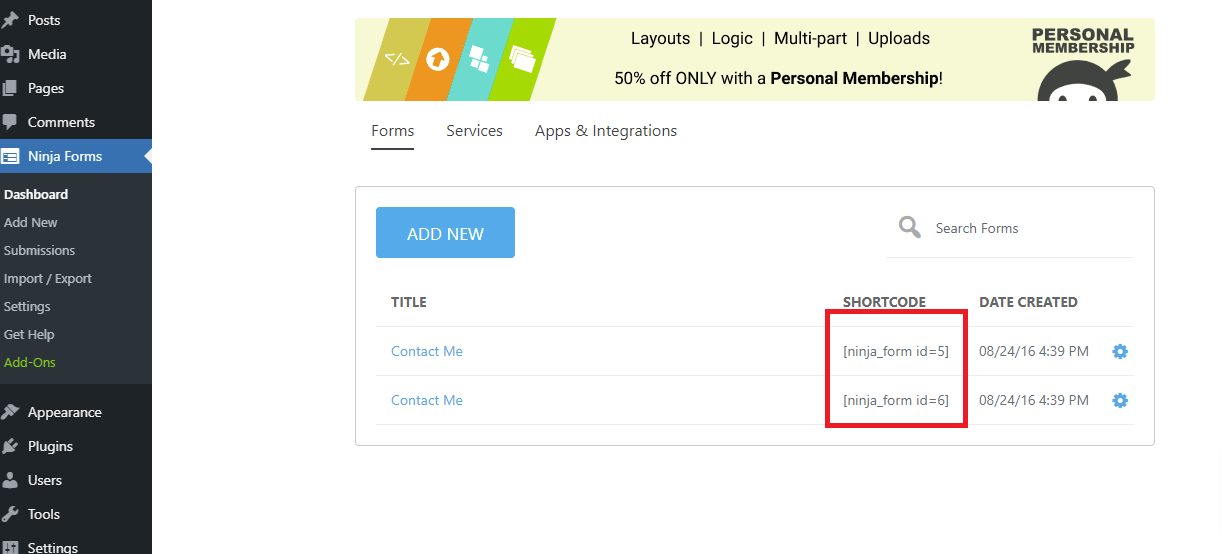
Another method of obtaining a shortcode is also available, but in order to proceed to the next stage, you must close the builder. Let’s go to Ninja Forms> All Forms so you can see that every form you create has a unique shortcode. This shortcode can be copied and pasted on any page of your website.
- Option 2: Using the” Append a Ninja Forms” box
Additionally, you can use Ninja Forms to show a contact form on your page by selecting it from the dropdown list in the “Append a Ninja Forms” box in the right sidebar.
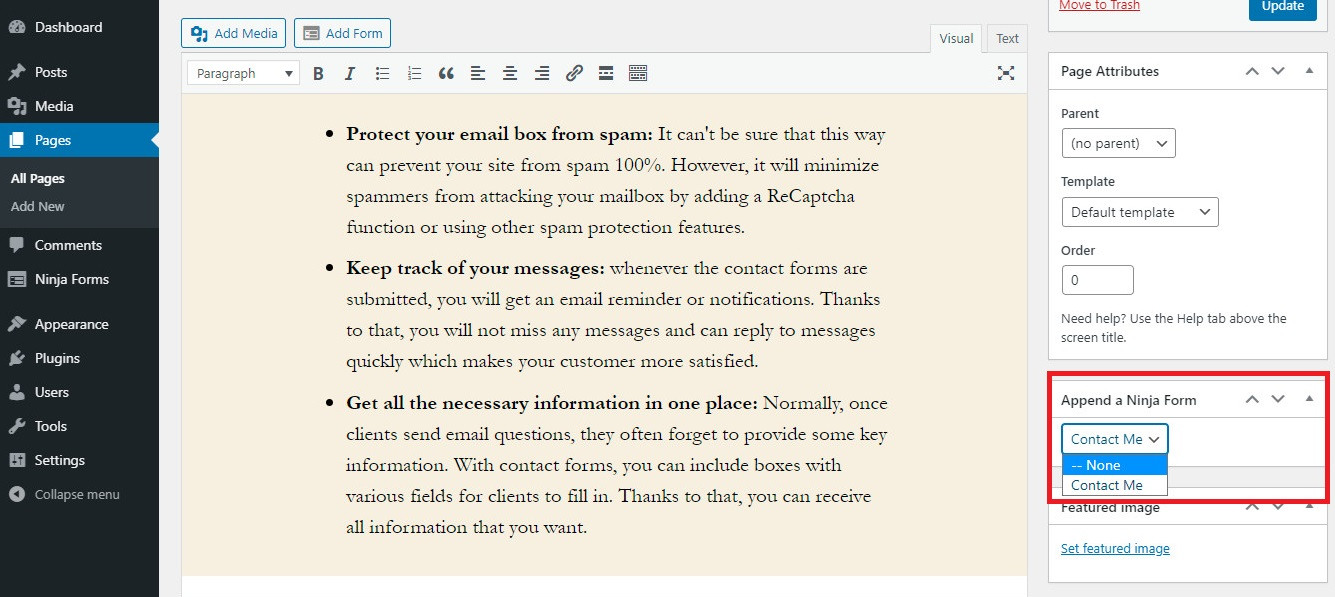
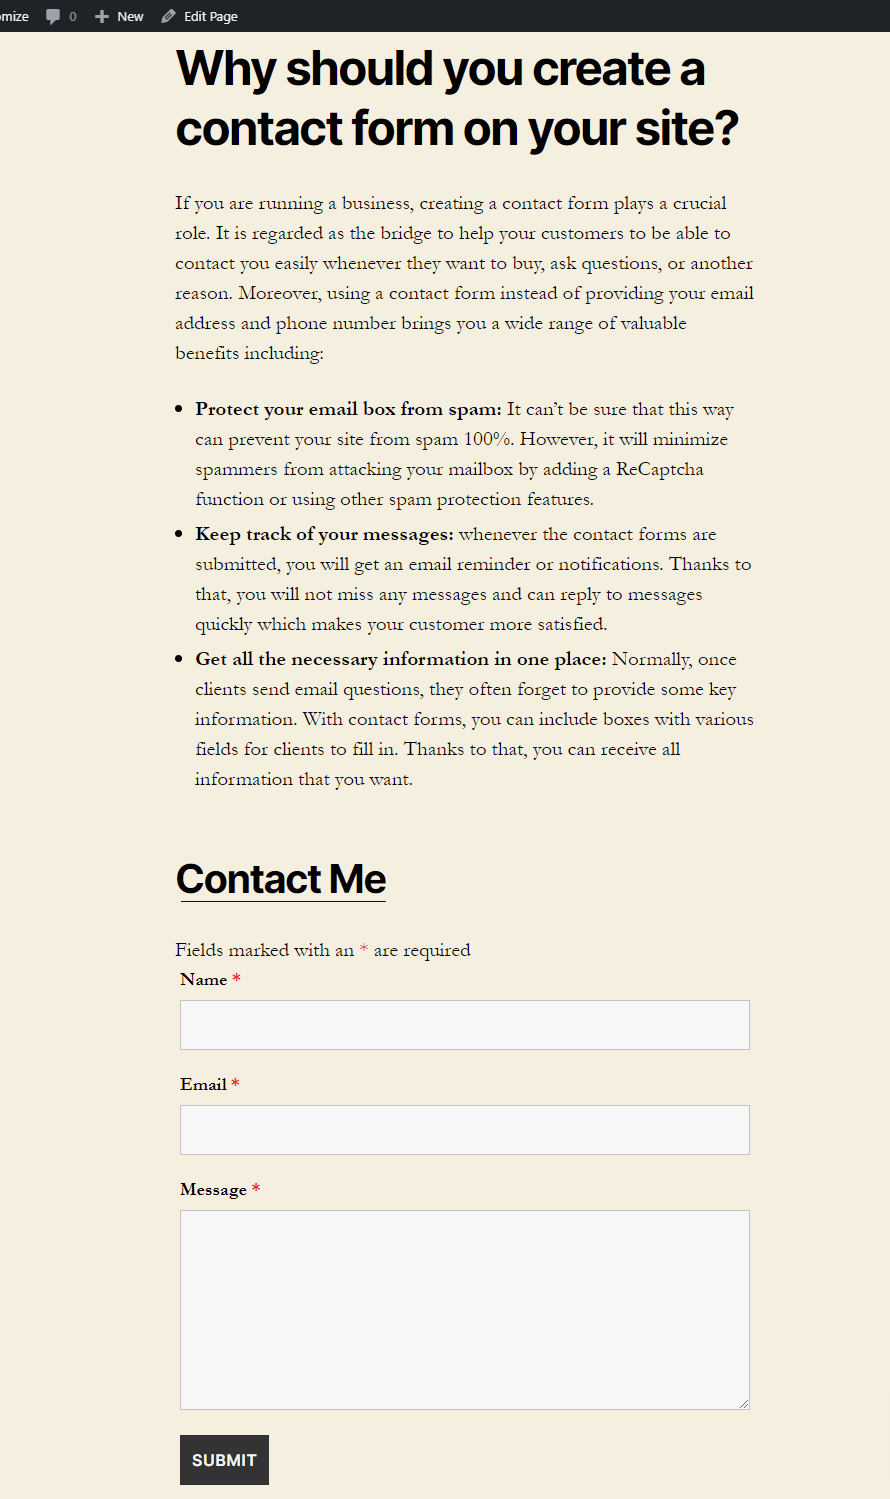
Let’s now examine the outcome.
- Option 3: Display the contact form on the widget
Just navigate to Widgets > Appearance. A menu of choices, which includes the Ninja Forms Widget, is available. Depending on your objectives, you can choose it and position the form in the sidebar, content top, or content bottom. Last but not least, remember to save your settings.

Method 2: using Formidable Forms
You may make a variety of forms, tests, surveys, timesheets, and other things with the help of Formidable Forms, a free WordPress plugin that lets you develop forms. It provides a built-in drag-and-drop form designer, allowing you to easily develop forms with plenty of features. Additionally, a Premium version is available. But in today’s tutorial, we also use the free version as an illustration.
We will skip this step and go on to the subsequent steps because the installation and activation of this plugin are similar to those of Ninja Forms.
Let’s now use the Formidable Forms plugin to construct a contact form in WordPress by following the step-by-step instructions below.
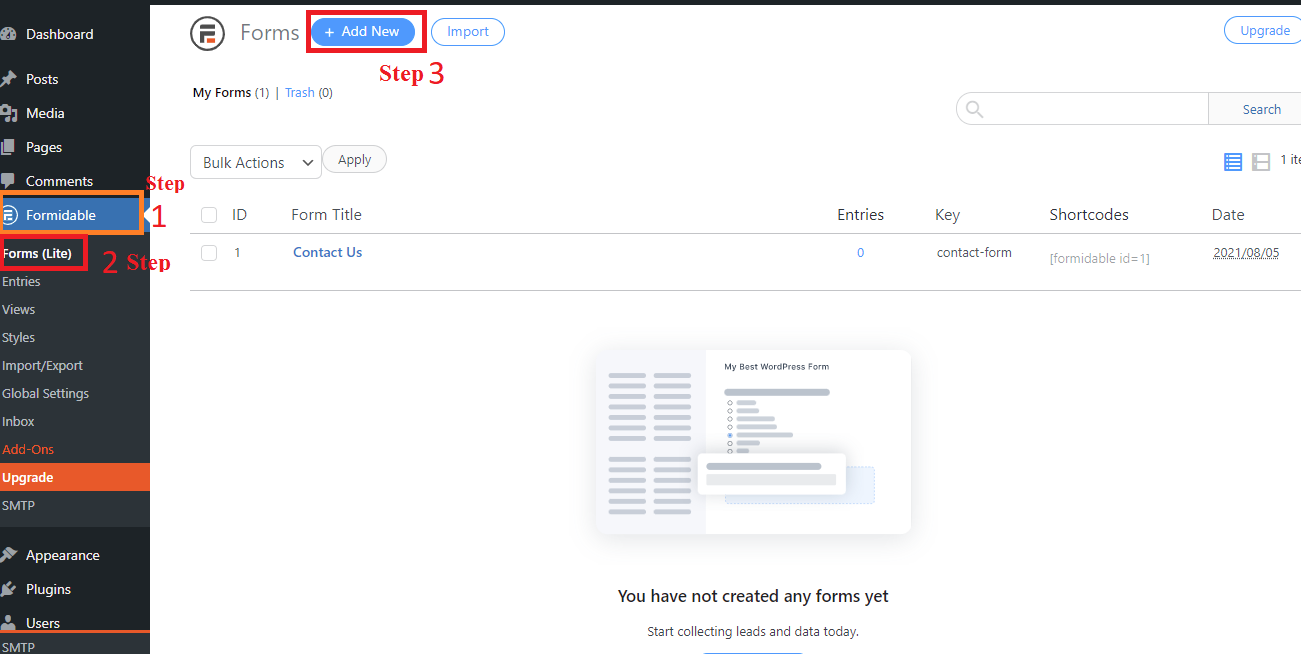
Step 1: Building a contact form
Once the plugin has been installed and active. Open a list of alternatives by going to Formidable> Forms(Lite) on your dashboard and clicking “Add new.”
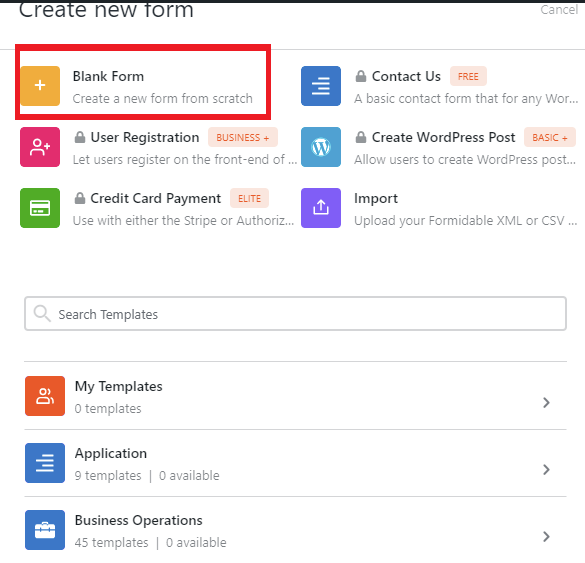
You can design a wide variety of shapes kinds using Formidable. However, you can only construct a form using the blank form or pre-made templates with the free version of this plugin ( you can need to provide an email to get the code, then you can get 10 pre-built templates).
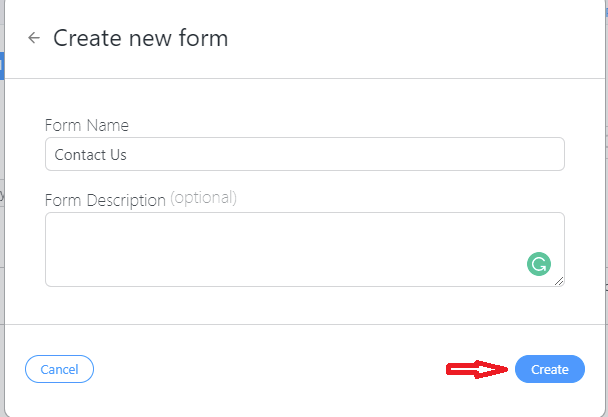
In this instance, we’ll select Blank Form to get going.
To go to the following step, you can fill up the form’s name and description and click the “Create” button.
Here, you may use the drag-and-drop tool to add the fields you want to the list of viewable fields. If you click on a field and desire to delete it, a trash can icon will appear.
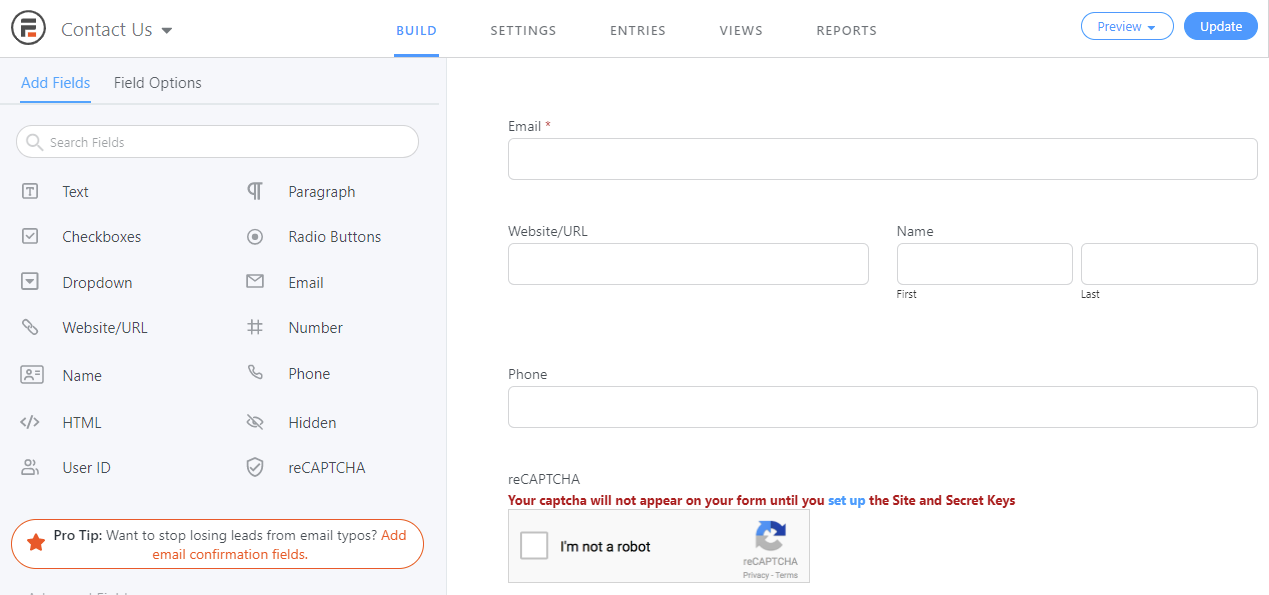
You can choose the field you want to customize for each one with a variety of helpful options. If you want this field to be necessary, click the Required checkbox. On the other hand, you can choose not to.

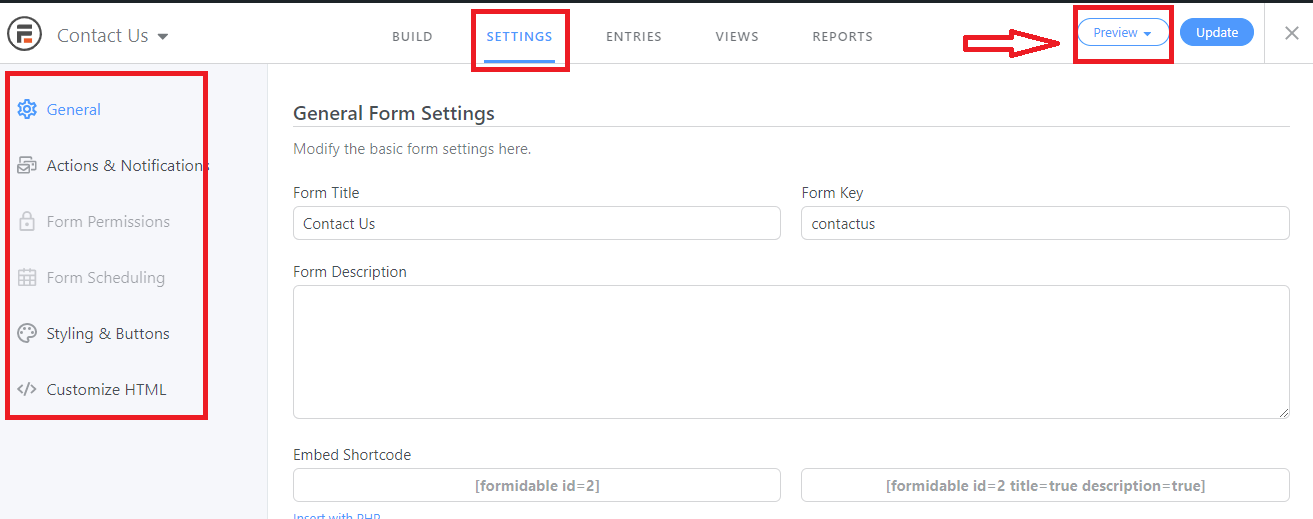
The form title, a message, and many other options can be changed under the General section of the Settings tab. You can enable or disable email notifications in the Actions and Notifications section. We advise leaving the default values if you want to get letter confirmations and email notifications.
To finish your contact form, click Update. In particular, this plugin enables you to preview your results by clicking the preview button as shown in the screenshot below.
Step 2: Adding a Contact Form to your page
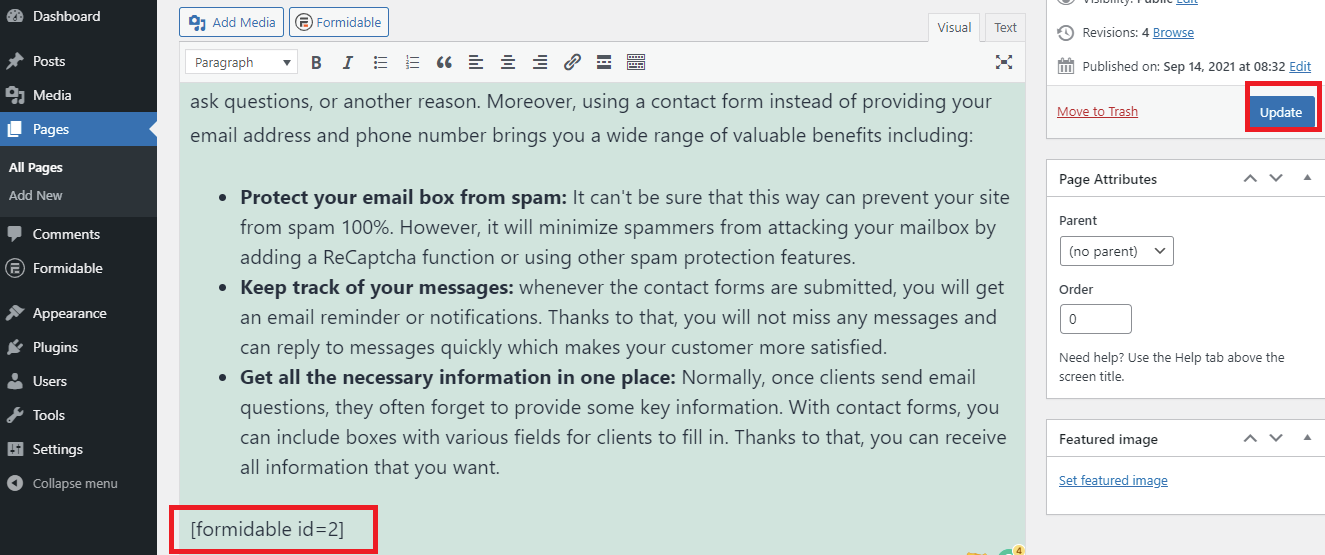
Before you can get back to the Formidable page, you must first close the constructor. Let’s copy your contact form’s shortcode and paste it into the shortcodes column.
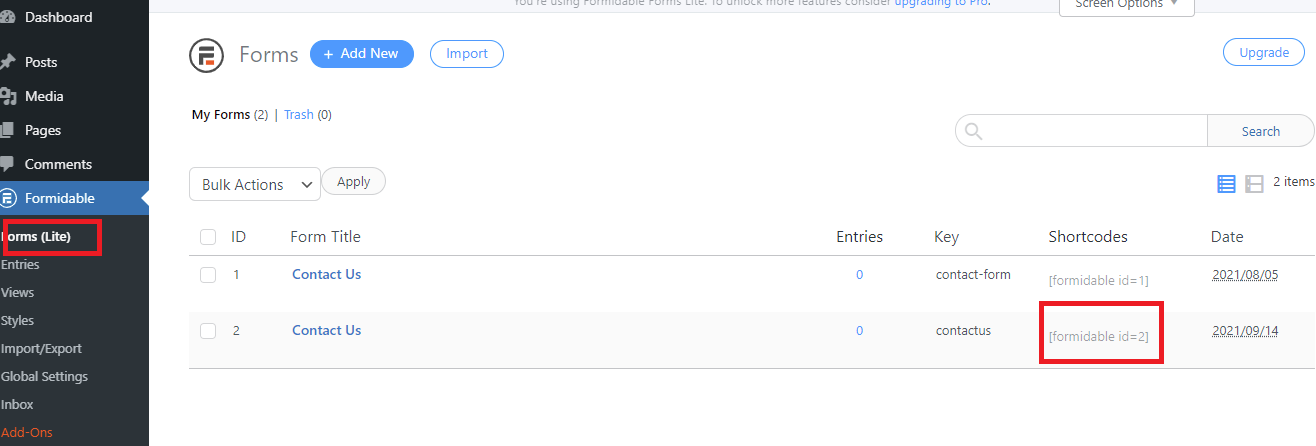
Don’t forget to publish or update your modifications after pasting this shortcode in any location on your page.
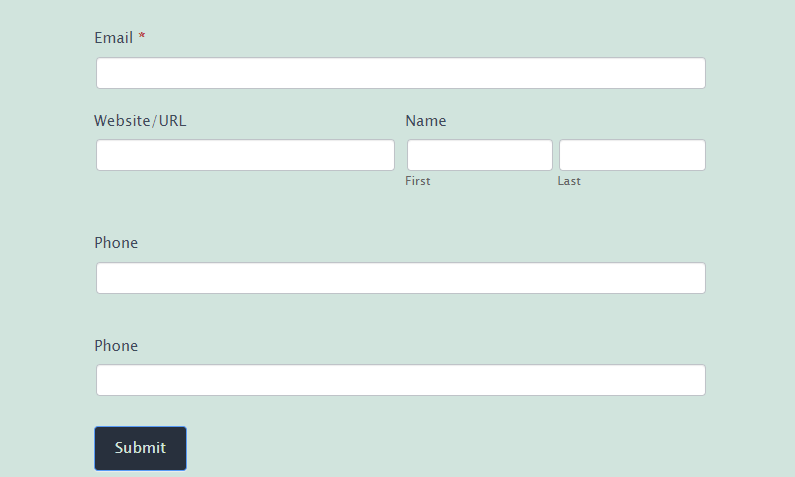
And it appears like this!
In conclusion
We have just given you a step-by-step tutorial that will help you utilize the two simple plugins to create a contact form in WordPress websites. Have you chosen your preferred option yet? If you’re still unclear, let’s visit the comparison blog for Ninja Forms and Formidable Forms to learn more about the differences between these plugins.
We hope that this post provided you with some helpful tips for quickly and easily displaying a contact form on your WordPress page. If you run into any issues when using these plugins, please let us know in the comment section below. We will help you out as soon as we can. Additionally, there are still other worthwhile alternatives that enable you to build a variety of forms for your website; for more information, go to WordPress Form Builder Plugin. Don’t forget to check out our website’s list of fantastic free WordPress themes as well.