Are you trying to add social share buttons in WordPress in the simplest way possible? Fortunately, you’ve come to the right spot; the article below provides some helpful tips to add social share buttons in WordPress with free plugins.
Why do you have to add social share buttons in WordPress?
Platforms for social media are now increasing much more. They are ideal locations to expand your business and attract lots of new online clients. You must provide your audience with a straightforward option to distribute your worthwhile material to their preferred social channels if you want to fully capitalize on these platforms. One of the simplest ways to accomplish this is to add social share buttons in WordPress on your website. If your postings are helpful to your readers, they will spread the word.
Including social network share buttons on your website may increase both traffic and the number of backlinks pointing to it. As a result, you will have more chances to connect with potential clients.
How to add social share buttons in WordPress?
Method 1: Using the Sassy Social Share plugin
One of the best Social Share Plugins for WordPress is Sassy Social Share. You can effortlessly add social share buttons and display share counts with this lightweight, user-friendly application to your WordPress blog. You can use this tool by following the instructions below.
Step 1: Install the plugin
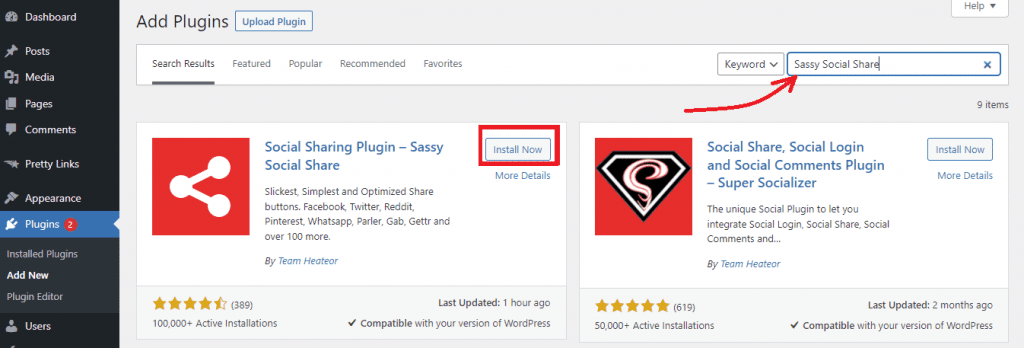
You must first install this plugin. Simply enter the plugin’s name in the search field under Plugins > Add New to locate it. Immediately after that, click the Install Now button to activate it
Step 2: Set your sharing buttons’ style
Let’s go to Sassy Social Share > Sassy Social Share page from your dashboard menu as soon as the plugin has been installed. This will direct you to the Settings page for the plugin.
From this point, you can select the designs for your sharing icons by altering the sharing icons’ rectangular, square, or round shapes. You can also alter the sharing icons’ border, background color, logo color, and size.
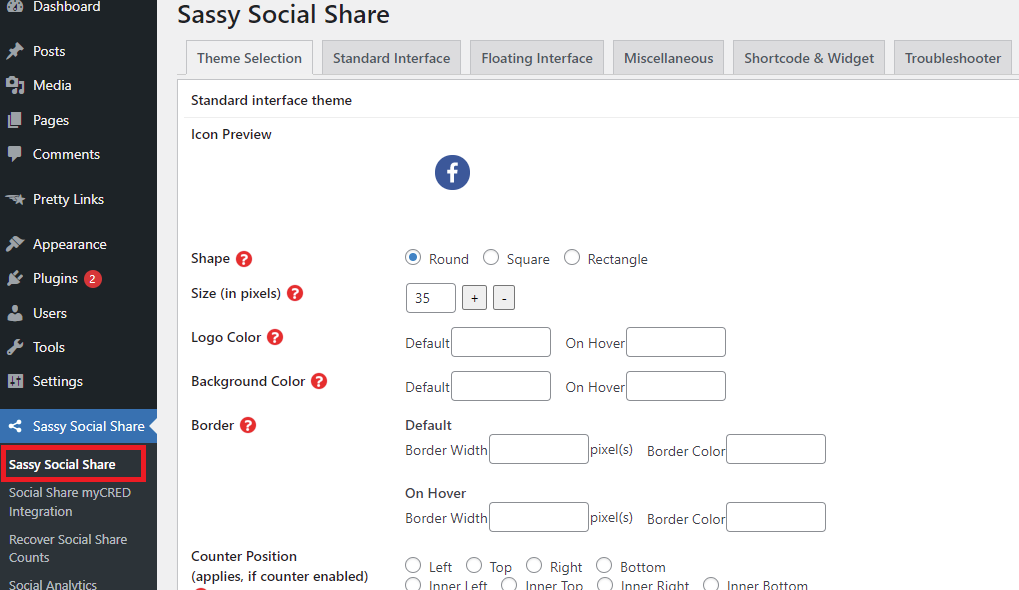
Click the Save Changes button at the bottom of the page to save your choice if you are happy with how your sharing icons look.
Step 3: Choose your favorite Social Networks and add them to Your Website
In order to select the social media networks you want to integrate into your WordPress site, you must now click on the Standard Interface page.
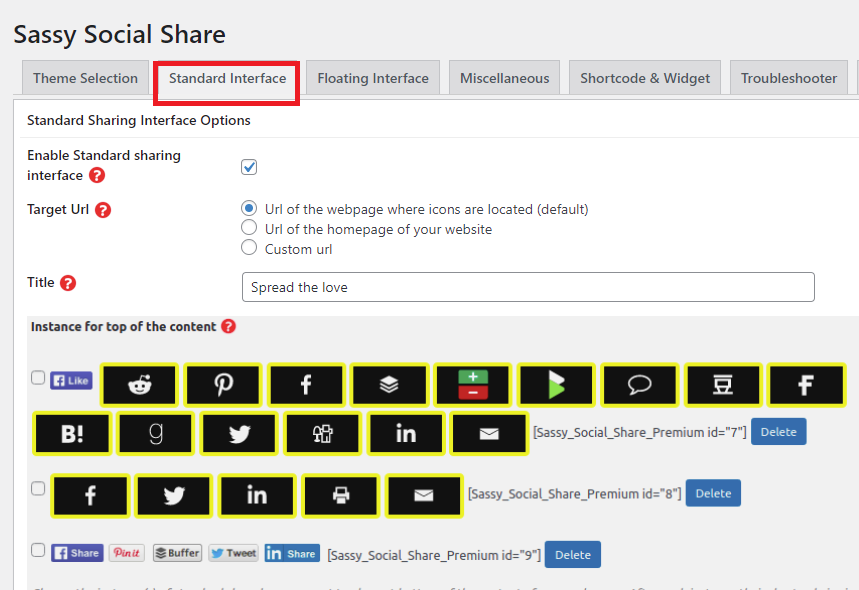
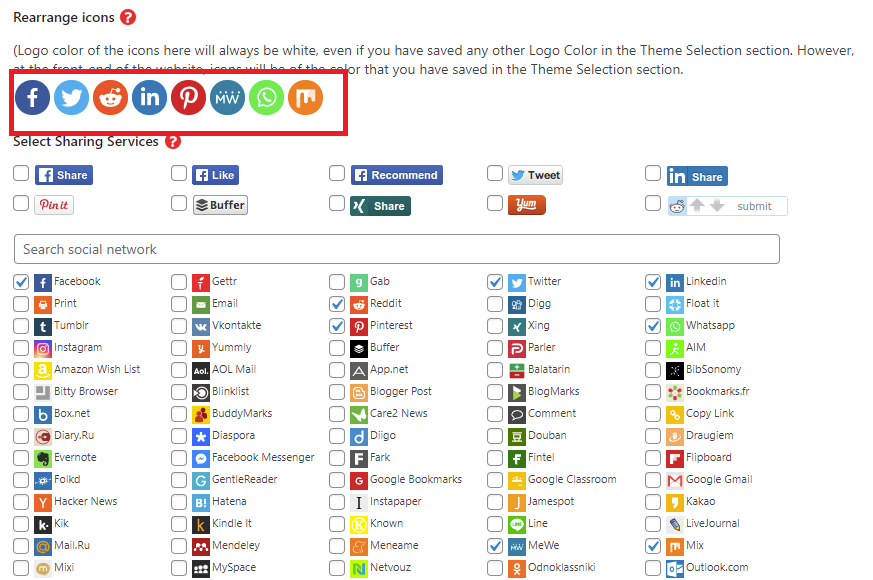
As you scroll down the screen, a gallery of social sharing services will appear. You may select how many of these services to use and where you want to display your sharing button. Additionally, you can drag icons to reorder them in the way you choose.
Step 4: Choose your location to display
You may now select the location where you want to display your sharing buttons after selecting the social networks.
Continue to scroll down the screen until you reach the Placement area. Then you may tick the boxes next to the locations where your sharing buttons can be added.
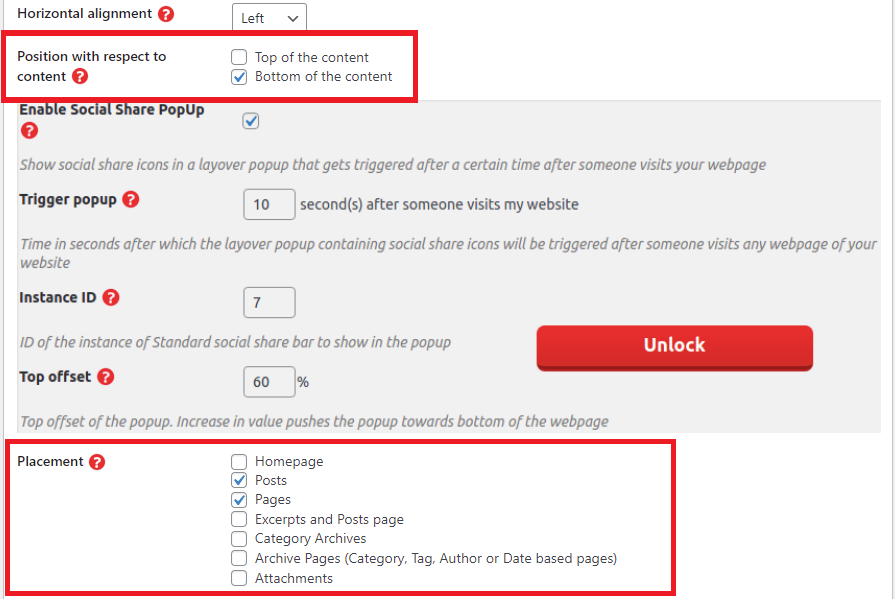
Additionally, you need to decide where you want your sharing buttons to appear. You may either put it at the top of your content or on a button.
Don’t forget to save your choice by clicking the Save Changes button at the end.
You can now browse your website’s front end to see the outcome.
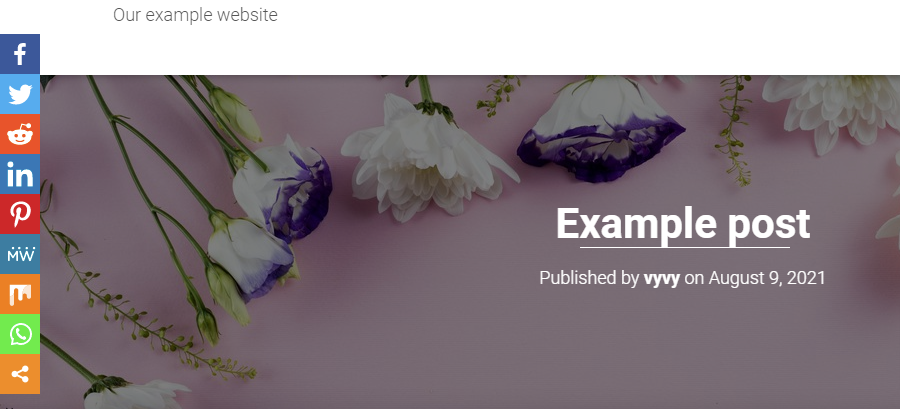
Method 2: Using AddToAny Share Buttons plugin
Another helpful and simple-to-use social sharing plugin for WordPress is AddToAny Share Buttons. It enables you to increase traffic and engagement by motivating users to share your posts and pages on various platforms. You can keep track of the subsequent actions in order to use this tool.
Step 1: Install the plugin
You can read our tutorial on the Sassy Social Share plugin above for more information on how to install the AddToAny Share Buttons plugin.
Step 2: Configure the plugin’s settings
Let’s enter the plugin’s settings page by going to Settings > AddToAny after the plugin has been installed.
You can change the sharing button for your WordPress site on the settings page.
- Standard share button settings
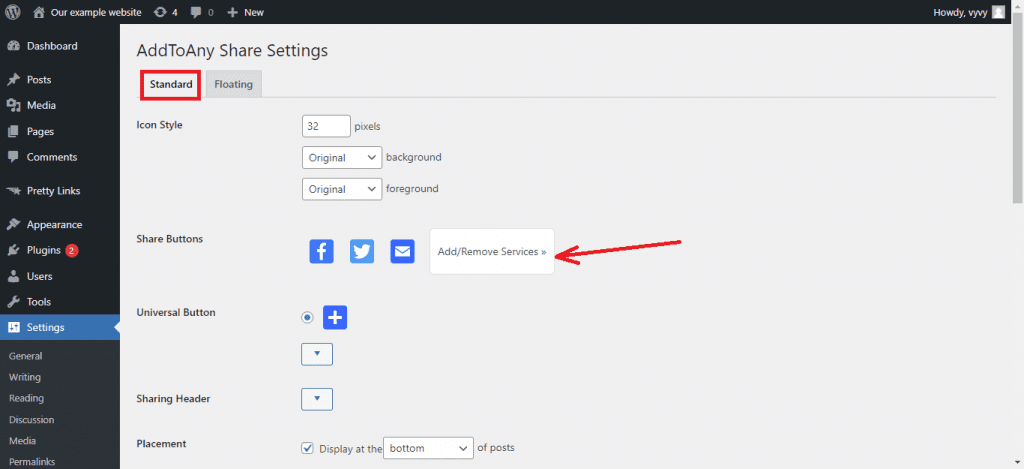
First, you may customize the styles for your sharing icons under the “Standard tab” by modifying the social media icons’ icon sizes and backgrounds.
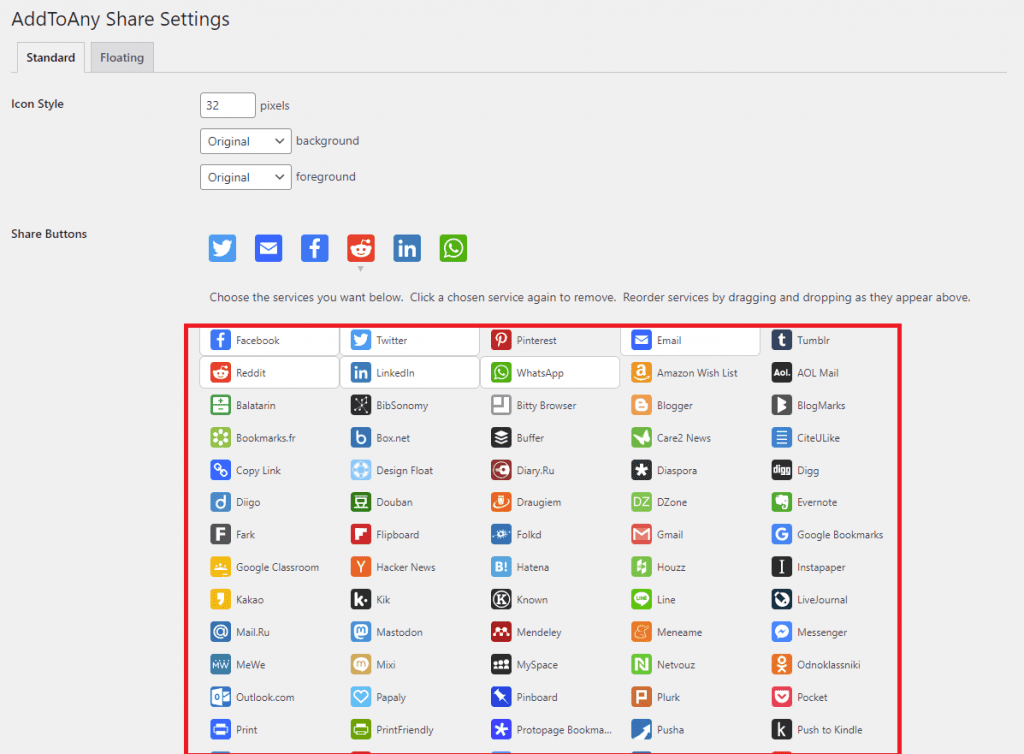
You will find three standard icons in the Share Buttons section, namely Facebook, Twitter, and Pinterest. By selecting Add/Remove Services, you can add or remove an icon from your website.
This will open instantly and provide a list of the more than 100 services the plugin includes. You may include as many as you like.
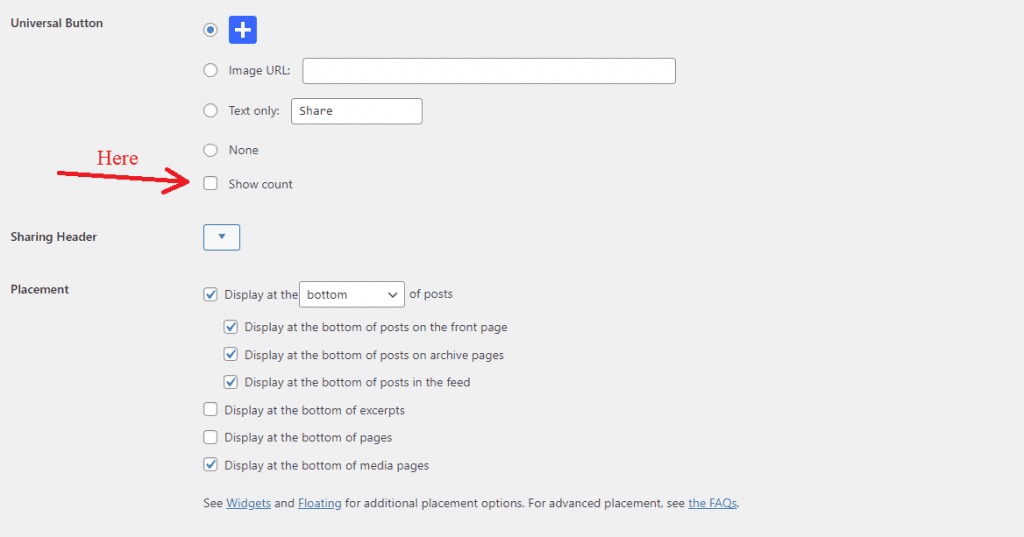
The Universal Button option, which is used to display a popup with additional social networking platforms not listed in the services menu above, is also shown if you scroll down the screen.
To display share counts for each page, check the “Show count” box.
Take a look at “Placement” in the menu. The share buttons can be displayed in a variety of locations. By clicking the Arrow sign, you can decide whether to place the share button at the top or bottom of your article.
You can select the pages you want to display the buttons below that.
Next, there are numerous other choices for WordPress provided by this plugin. Additional CSS or Additional JavaScript can be used to provide stylistic elements like custom colors and further enhance the functionality of the buttons.
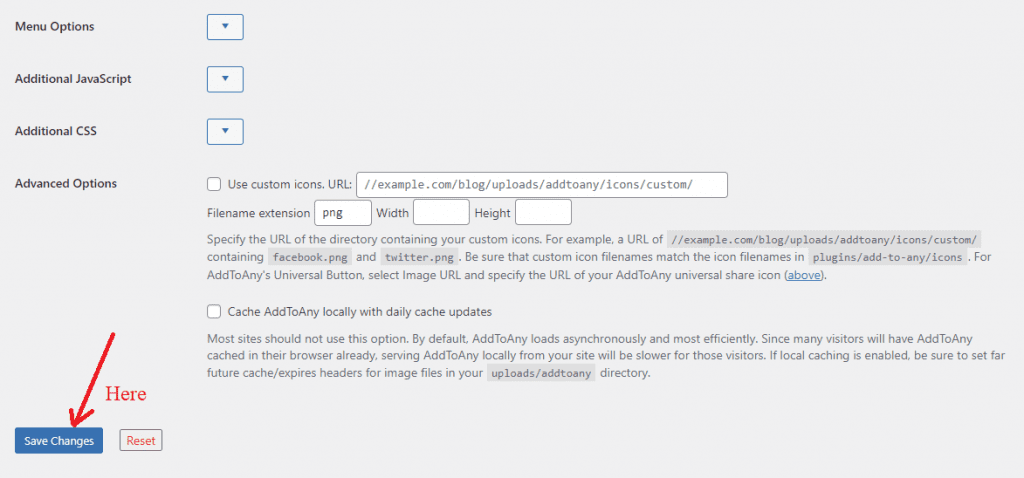
You can provide a specific URL where your share icons should be defined in the Advanced options. The default share buttons on the AddtoAny module will be replaced by this option.
The custom URL will lead to a folder that contains all of the picture share buttons, so keep that in mind. The filename format should be “nameofsocial.png”. For instance, twitter.png will be the share icon for Twitter.
Let’s click the Save Changes button when you’re finished.
- Floating share button settings
A floating share button is an additional option to the usual share button that AddToAny provides. You can add a floating share button using this functionality to your WordPress website.
On the plugin options page, select the Floating tab if you would rather utilize floating icons than regular icons.
You can now decide where to position the Vertical buttons. This primarily applies to large-screen devices. It frequently docks to the left side of the page on the majority of websites. You can, however, pick your preferred location for display.
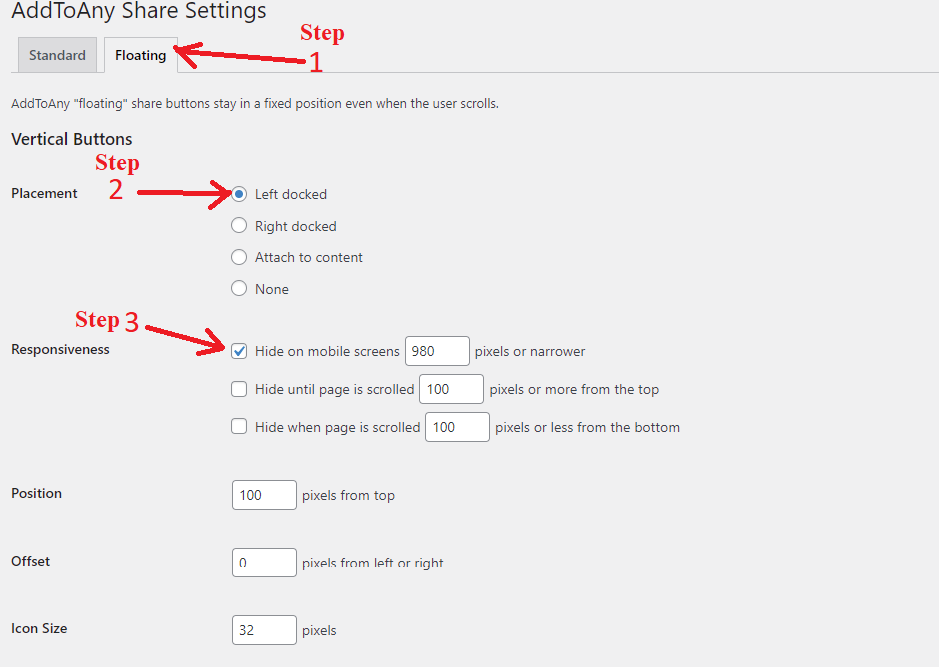
You may select the breakpoint at which the floating share button will show under Responsiveness. The large screen setting is the default (980 pixels).
As you continue to browse down the page, you’ll come across the “Horizontal Buttons” section for mobile phones and other small screens. On large screens, you can also select to hide the icon or increase its size, position, and visibility.
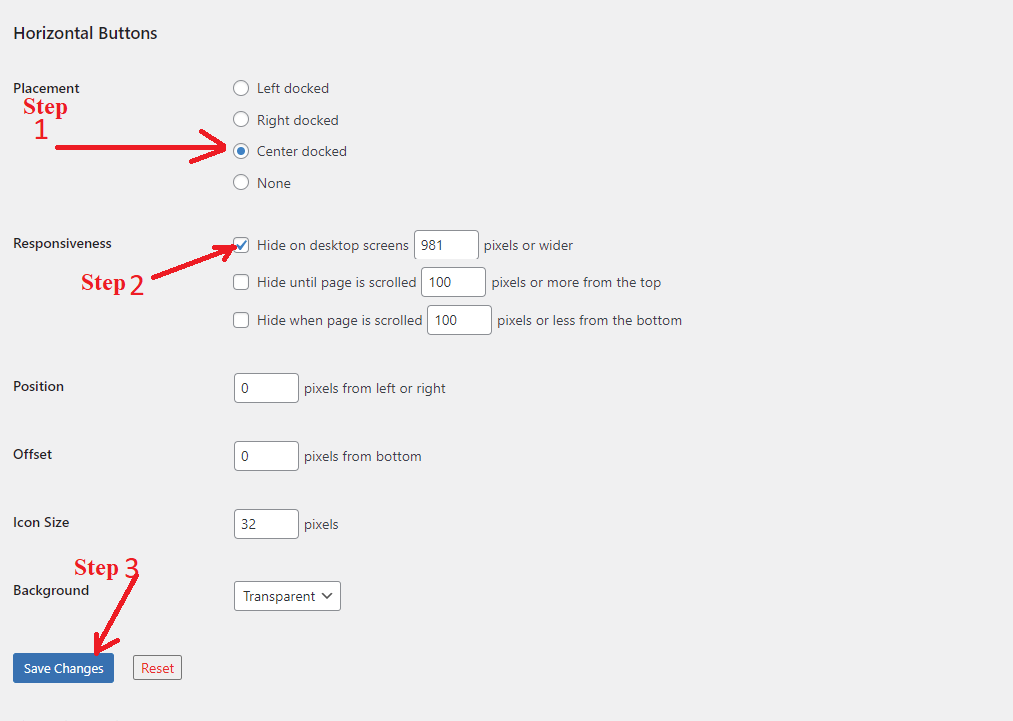
Clicking “Save Changes” will complete the process if you are satisfied with your choice.
You may now visit any post on your website and see how your share buttons are displayed there.

The conclusion
In short, it is quite essential to add social share buttons in WordPress. Because it increases both the traffic to and the search engine rating of your website. This tutorial should have shown you how to quickly add social share buttons in WordPress. Please don’t be hesitant to leave a remark below if you have any questions or concerns. Last but not least, be sure to visit our website for Free WordPress Themes to browse a vast selection of responsive, contemporary, and expert designs. Let’s meet and get one to create the website you want.
